
Creating a Flat Design Skull in Illustrator CC

Halloween is just around the corner! So let me take you through a super simple method in creating a flat design skull in Illustrator CC.
We will use simple shapes and the shapebuilder tool to put our skull together. All in all, this method should take no more than 15 minutes to finish if you follow these instructions. Let’s begin!
Start by creating a new document. I’ve set mine up as a square at 1200x1200 pixels.
Next, create a circle and colour it a light grey. This will serve as the main part of our skull.
To create the jaw, we will need to create a rounded rectangle with a length slightly narrower than our skull, as seen in the image below.

Make sure your smart guides are on, if not turn them on by clicking on view, smart guides. This will help us to accurately line up our rounded rectangle in the middle of our circle. Move it up so it overlaps the base of the circle.

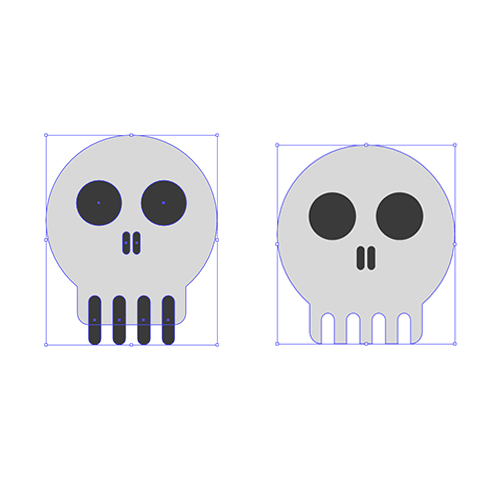
We can begin to see the shape of our skull coming together, but our shapes are still separate. To join them, select both shapes and go to Pathfinder, Unite. This will join both shapes into one.
QUICK TIP: If you can’t find your pathfinder tool in the right hand tool bar go to Window —> Pathfinder to open it up.

The main part of our skull is built!
Next, we will create 2 circles for the eyes and 2 rounded rectangles for the nasal cavity. Centre these in the middle of the skull and colour them a darker grey.

Finally, we need to create the illusion of teeth on the bottom part of the jaw. To achieve this, create a rounded rectangle. With your newly created rectangle selected, hold down ALT and click onto the shape and drag it out to duplicate it. Press CTRL + D twice to repeat the transformation, giving us 4 shapes. Group them, and line them up at the bottom of the jaw.
Select the 4 grouped rounded rectangles as well as the skull and again, go into Pathfinder, but this time, select MINUS FRONT, this option will cut out the shape of our tooth gaps from the jaw. You will notice that in doing this, illustrator will have moved your skull to the front, meaning you can no longer see your eyes and nasal cavities. This is easily fixed by right-clicking the skull and selecting Arrange, Move to Back. Voila!
Our skull is complete! Leave it there if you want, or keep reading to add some further details to give some highlights and shadow to your design.
To add a highlight to the top of the skull, create a circle slightly smaller than the one you created to form the base of the skull, and overlap it where you would like to add a highlight.

Select both your skull and the new circle and go to your shapebuilder tool. With your shapebuilder tool selected, you’ll see your curser has a plus sign next to it. This is the default setting of the shapebuilder tool, and will allow you to join to shapes, similar to the pathfinder tool we used earlier. This time, however, we want to essentially remove the bit of our new circle that goes beyond the bound of our skull. To do this, hold down ALT and click this area to remove it. Easy!

Next, select your new shape, colour it white and turn the opacity down to about 10% to complete the highlight.

Finally, to create the shadowed area at the bottom of the skull, we will use a similar process, but with some tweaks. Firstly, we will be cutting away a major part of our skull to create the shadow, but we don’t want to mess with our design, so the first thing we will do is CTRL + C to copy our skull and then CTRL + SHIFT + V to paste it directly over our existing skull. Next, create a slightly bigger circle than before, and place it above our skull. This time, the part of our skull that is not covered will become the shadowed area of the design, so play around with the positioning of your circle to find the sweet spot!

Again, select both the skull and the circle and select the shapebuilder tool. Hold down ALT and click on the main part of the circle to remove it. This leaves our sliver at the bottom of the skull. Depending on whether your circle covered some of the teeth, you may have a few areas where your circle peeked behind some of the gaps in the jaw that you need to get rid of, use your shapebuilder tool to remove these 1 at a time until you are happy. Select your newly created shadow shape, colour it black, and turn the opacity down to 10%.

All done! You now have a wonderfully simplistic skull to use in your own designs. Add more detail if you want, colour it some funky colours, or just use it as it is!
